Adding Multiple Network Interface Cards (NICs) to a Device42 VM
If you need to reach networks that aren't reachable from the primary virtual machine network adapter — for example, for discovery — you can add additional network adapters to the Device42 VM. This page covers how to add NICs, configure them, and verify the network configuration.
Add Multiple NICs to the VM

Create an additional network adapter in the virtual machine settings. The screenshot above shows the process for VMware ESX.
Some virtualization platforms do not support adding NICs to a running instance. If this is the case for your platform, shut down the Device42 instance before adding the NIC.
You can add as many NICs as needed. One NIC will serve as the primary interface with the default gateway and DNS defined. The other NICs will provide direct connections to specific network segments only.
Configure the Assigned NICs
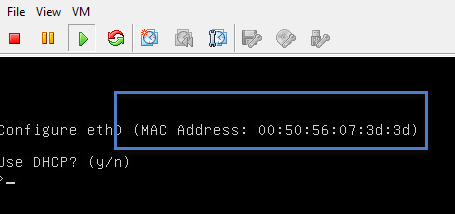
From the Device42 VM console, select option 1, then choose n at the Use DHCP prompt.
For each NIC, you will be prompted for the IP Address, Netmask, Gateway, and DNS Server. The console displays the MAC address of the NIC being configured — compare it with the MAC address shown in the virtual machine console to confirm you are assigning the correct IPs to each card.
First Interface Vs. Other Interfaces
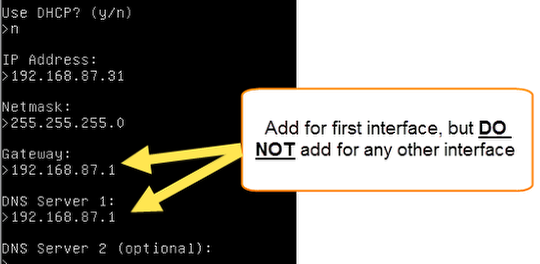
Add the Gateway and DNS information for the first NIC. For all additional NICs, add only the IP Address and Netmask — do not add the Gateway or DNS, as doing so will significantly slow the boot process while configuring the network interfaces.
You can verify your configuration from the Device42 Appliance Manager, as described in the next section.
Check Your Network Configuration
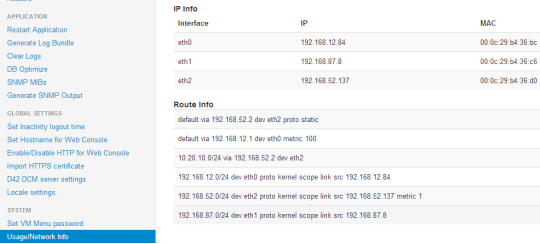
In the Appliance Manager, navigate to System > Usage/Network Info to view your network configuration.