Confluence Integration
This page is for Confluence administrators who want to surface Device42 infrastructure data inside their Atlassian Confluence instance. By the end, you can display and link to Device42 objects within Confluence pages and keep that data synchronized.
The Device42 Confluence integration connects Device42 to your Atlassian Confluence instance, letting you display and sync Device42 CI data directly within Confluence pages. This page covers installation, configuration, synchronization, space filters, and macros.
The integration supports the following features:
- Display details of a particular Device42 object (devices, racks, PDUs, and parts are supported).
- Display an inline link to a particular Device42 object (devices, racks, PDUs, and parts are supported).
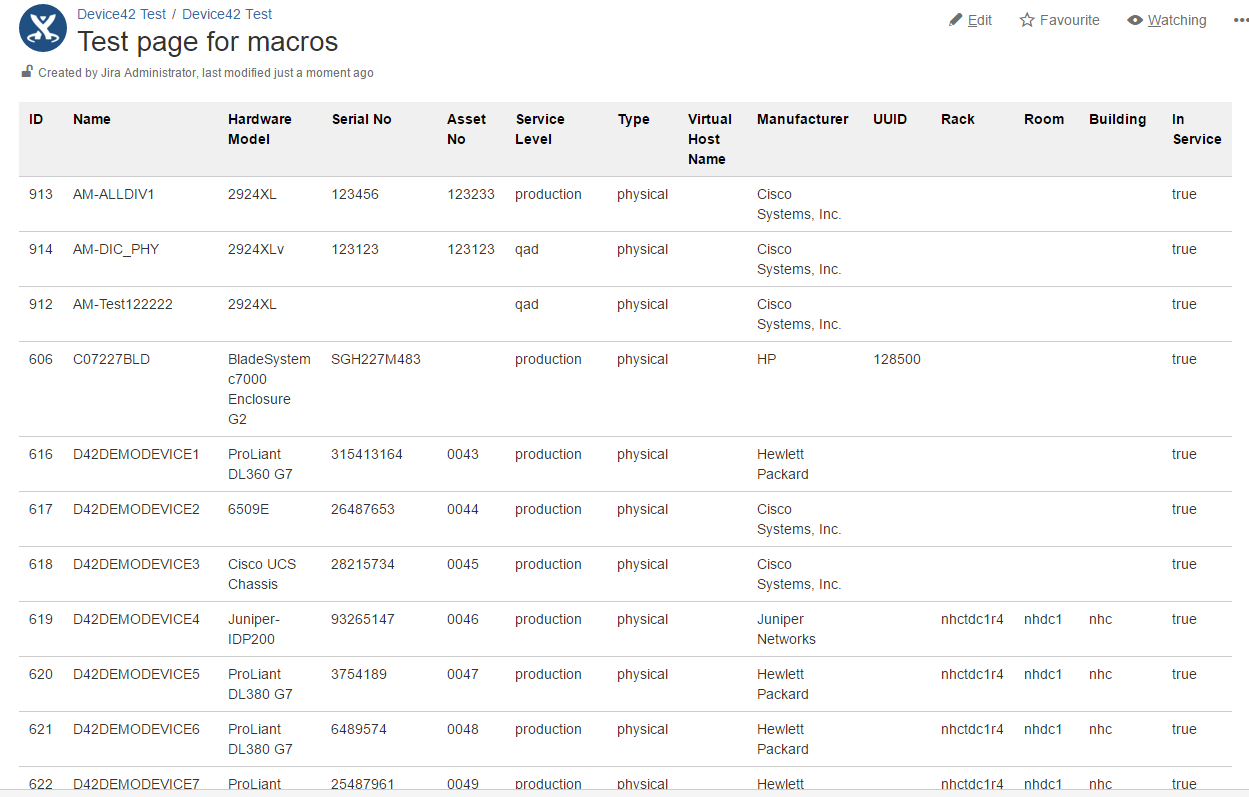
- Display a table of Device42 objects.
- Synchronize Device42 data with Confluence manually or periodically.
- Filter the set of Device42 CIs to display inside macros for a specific space.
Prerequisites
Before installing the add-on, make sure you have:
- A Confluence user with the Confluence System Administrators global permission to install the add-on, and Confluence Administrators permission to configure it
- A running Device42 instance
- A stable network connection between the server hosting Confluence and the server hosting Device42
Install the Confluence Integration Add-On
Device42's Atlassian Confluence add-on ("Device42 CMDB Connector for Confluence") can be found in the Atlassian Marketplace. You can install it using the UPM (Universal Plugin Manager) built in to Confluence. If you have special requirements (for example, an environment that blocks Confluence from accessing the internet), you can install the plugin manually. Note that the plugin requires a stable connection between the servers hosting your Confluence application and the server hosting Device42.
The Confluence plugin is now certified for Data Center and is available on the Atlassian Marketplace.
Install Automatically
-
Log in as a user with Confluence System Administrators global permission.
-
From the Confluence administration console, in the Atlassian Marketplace section, select the Find Add-Ons menu.
-
In the search field, type Device42 and press Enter. You should see the following screen:
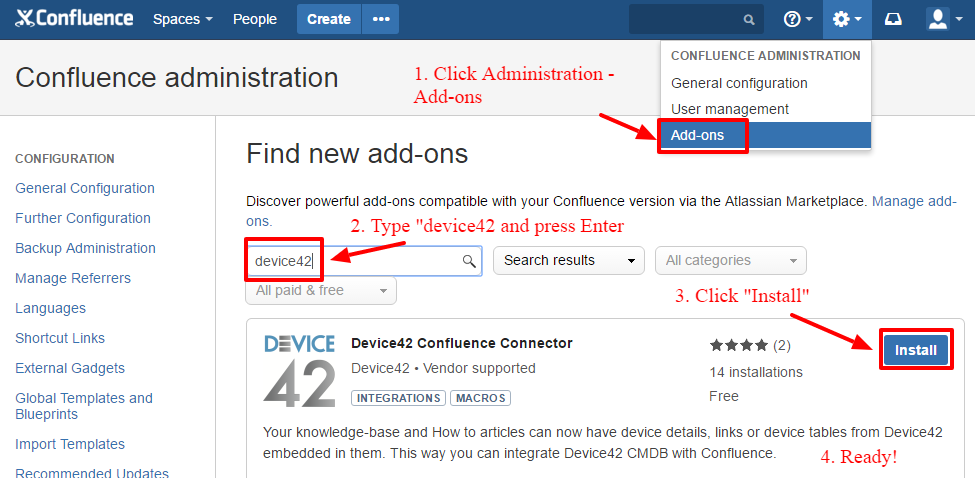
-
Click Install. A confirmation message appears when the add-on is successfully installed.
You can now manage the add-on from the user-installed add-on list on the Manage Add-Ons page.
Install Manually
-
Download the latest version of the add-on from the Atlassian Marketplace: Device42 CMDB Connector for Confluence. If you do not have internet access, download the
.jarfile from a computer outside your network and transfer it manually. -
Log in as a user with Confluence System Administrators global permission.
-
From the Confluence administration console, click Add-Ons and select Manage Add-Ons.
-
Click the Upload Add-On link at the top right of the page. The following dialog appears:
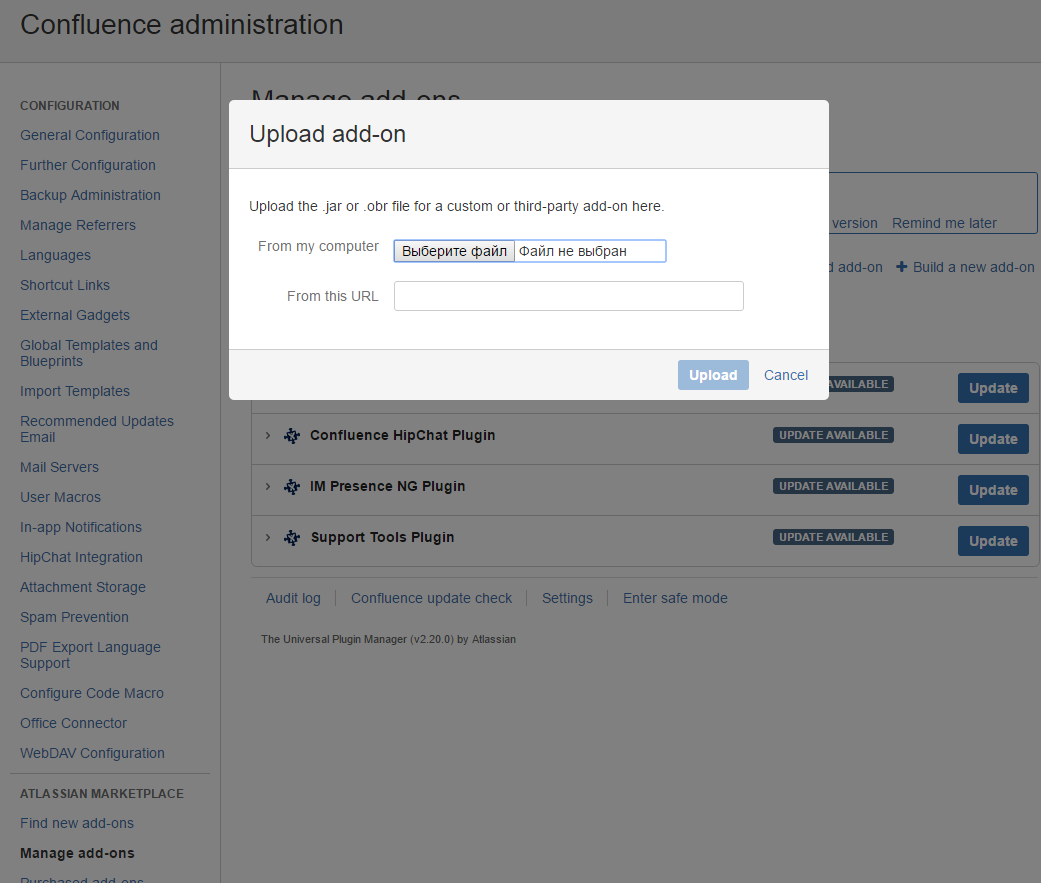
-
Enter the location of the
.jarfile (from step 1) using the file chooser, or specify a network location by entering a URL. -
Click Upload. A confirmation message appears when the add-on is successfully installed.
You can now manage the add-on from the user-installed add-on list on the Manage Add-Ons page.
Configure the Device42 Confluence Add-On
-
Log in as a user with Confluence Administrators global permission.
-
From the Confluence administration console, select DEVICE42 CONNECTOR > Device42 Connection to open the configuration page.
Keyboard shortcut: g + g + start typing Device42.
You will see the configuration screen:
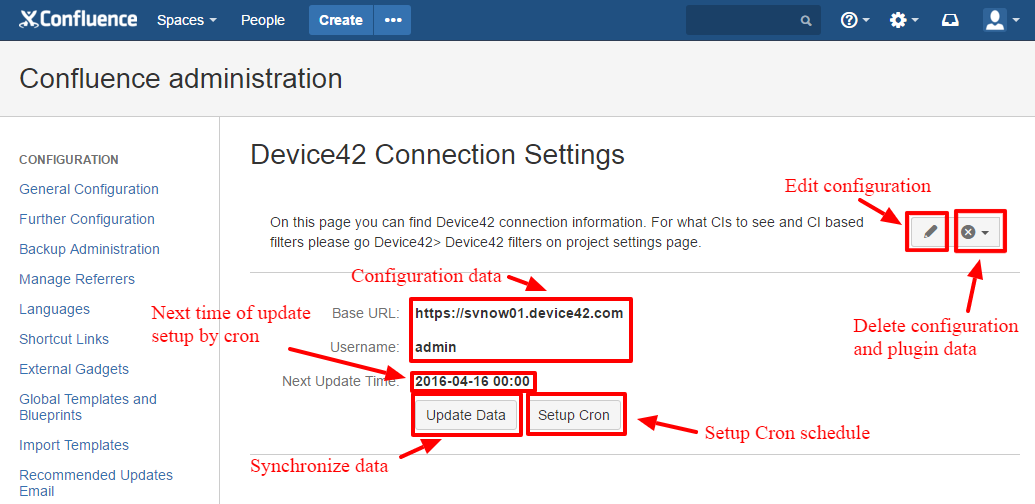
Set Up the Device42-Confluence Connection
-
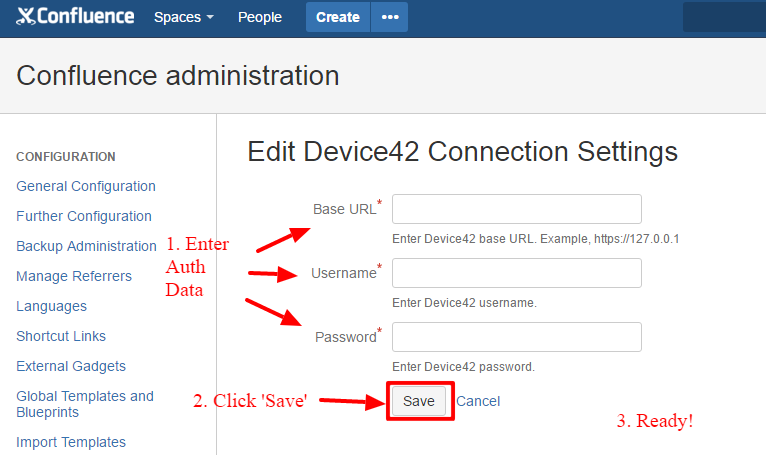
On the configuration page, click Edit to set up the connection to your Device42 instance. The following page opens:
-
Enter the connection information.
-
Click Save.
-
The saved details are displayed on the configuration view screen.
Synchronize Manually
Data from your Device42 instance is cached inside the internal Confluence database. To keep your data updated, run a sync periodically — either automatically or manually.
To launch an immediate synchronization:
-
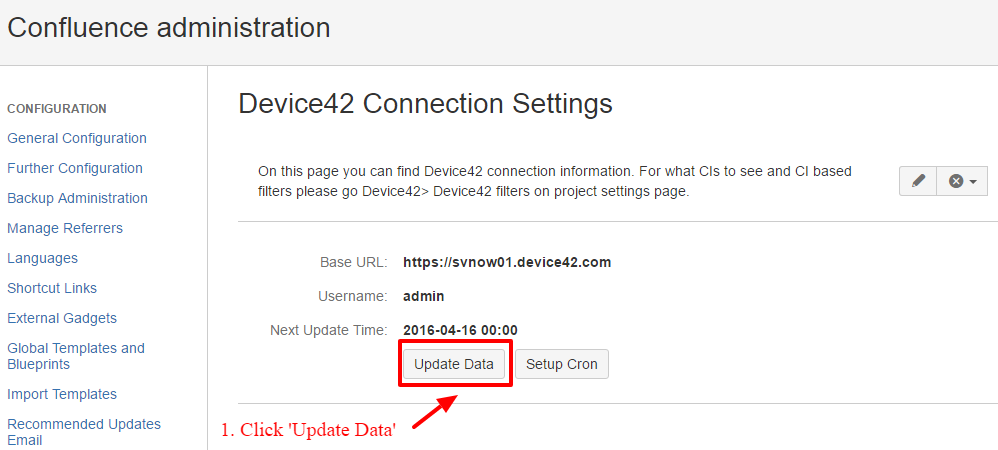
On the configuration information page, click Update.
-
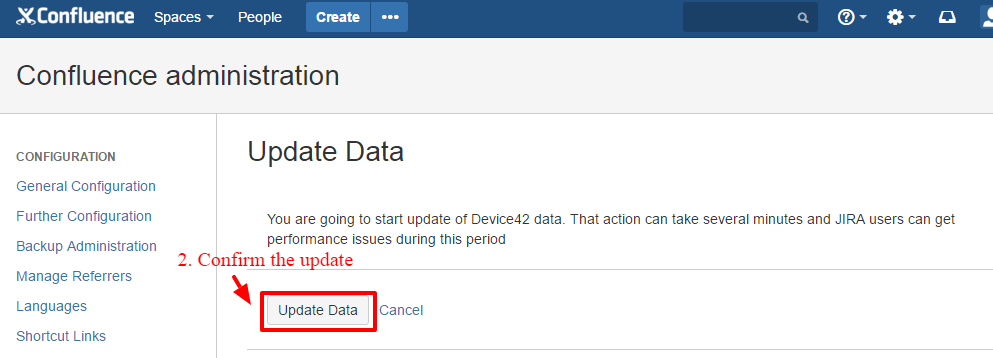
A confirmation dialog appears. Click Update Data.
-
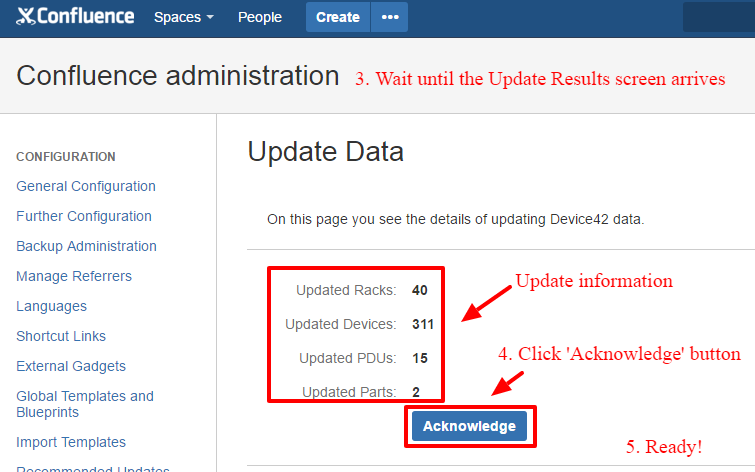
Wait a few seconds for the server to request new data from Device42.
-
After synchronization completes, you will see the following on the synchronization info screen:
Set Up Automatic Synchronization
You can set up automatic updates using cron expressions.
-
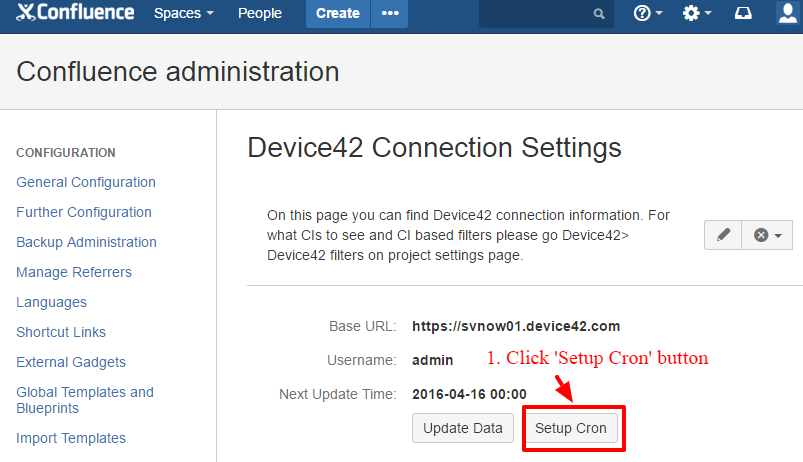
On the configuration information page, click Setup Cron.
-
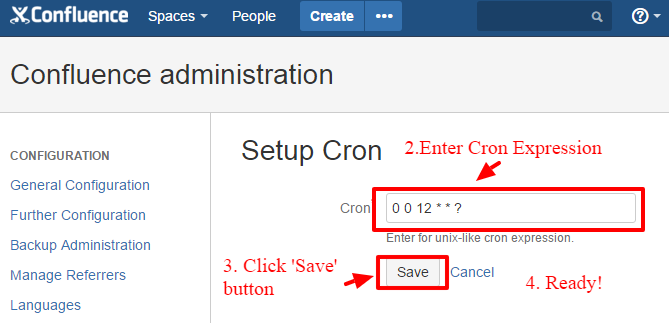
Enter the cron expression rule in the cron configuration dialog:
-
Click Save.
-
The saved details are displayed on the configuration view screen.
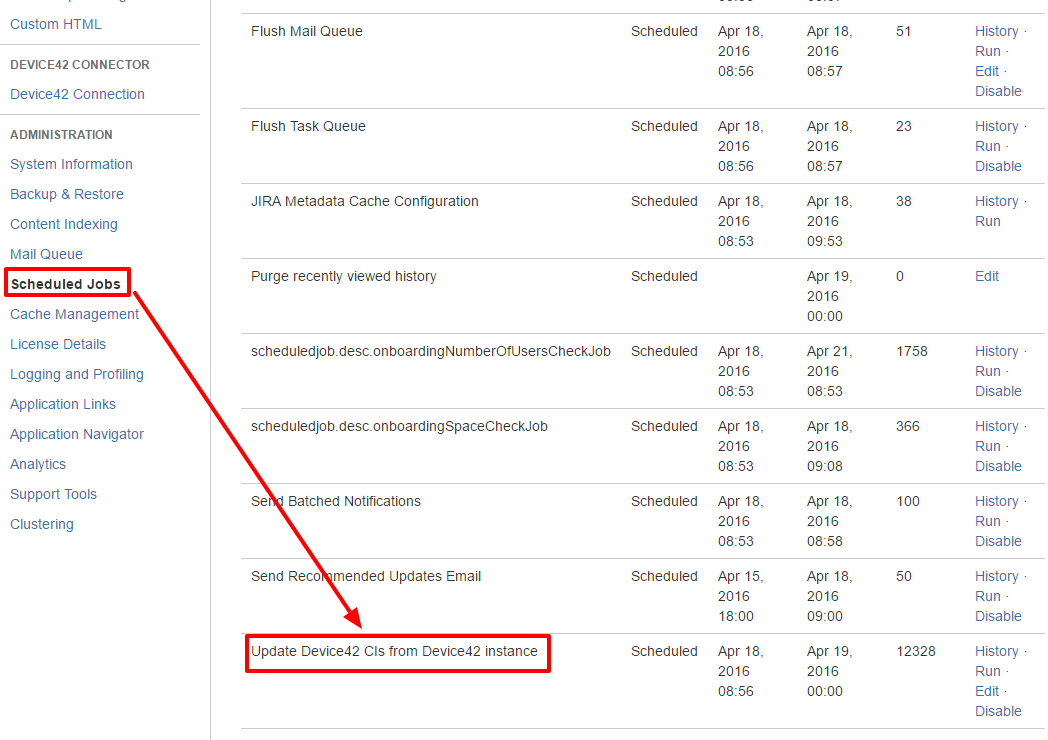
Note: The Device42 Confluence Connector uses the default Confluence Scheduler mechanism. Instead of using the Update Data dialog or the Setup Cron dialog, you can use the Scheduled Jobs menu to run Device42 update jobs directly. You can also set up a cron schedule there, and those changes will be reflected automatically on the Device42 Configuration page. By default, the job runs daily at midnight server time.
Configure Confluence Space Filters
Space filters control which Device42 CIs are visible within specific Confluence spaces and macros.
Filter Settings
Each Confluence space can have a space filter configured. Multiple filters can be configured for one or more CI types. If you configure multiple filters for one CI type, you can use them separately by adding multiple table macros to the space and selecting each space filter to filter CIs on different values or categories.
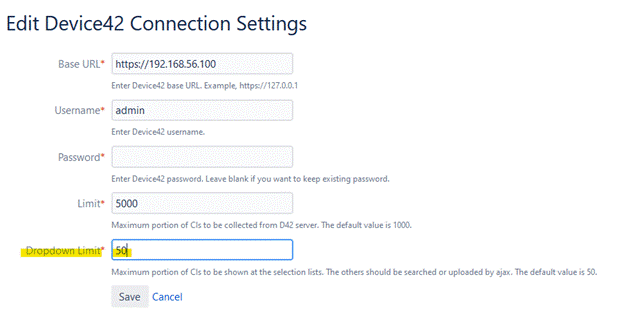
Note: Pagination is not yet available for the table macro. If you need to view more than the default 50 results, change the Dropdown Limit value on the Device42 plugin connection screen to a higher value like 100 or 150. Do not set this value too high, as it may cause significant delays in dropdown displays.
-
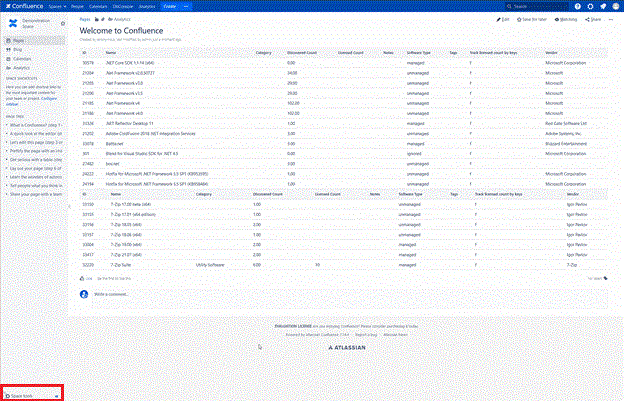
Access filter settings from the Space Tools menu at the bottom left corner:
-
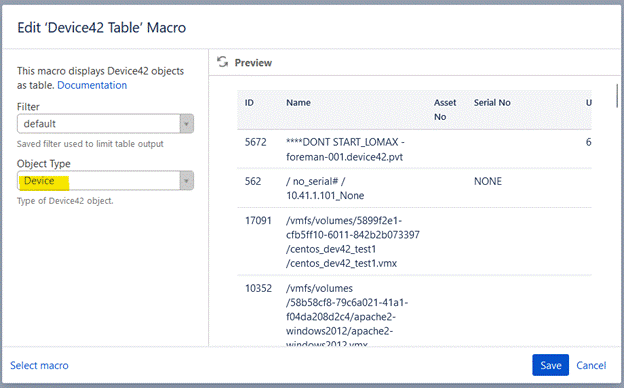
On the settings page, configure any CI or multiple CIs using one interface. Note that if you configure the Device CI and the Parts CI, the filter will be applied only to the CI selected in your Table Macro dropdown:
-
Configure a space filter to show software with a name of
.NET: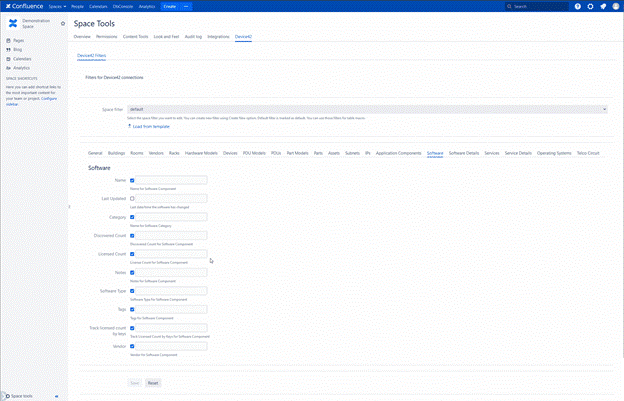
-
Do not leave this screen until you get the green confirmation prompt confirming your filter has been saved. This gives the plugin time to process the filtering of the database items stored in your Confluence database.
-
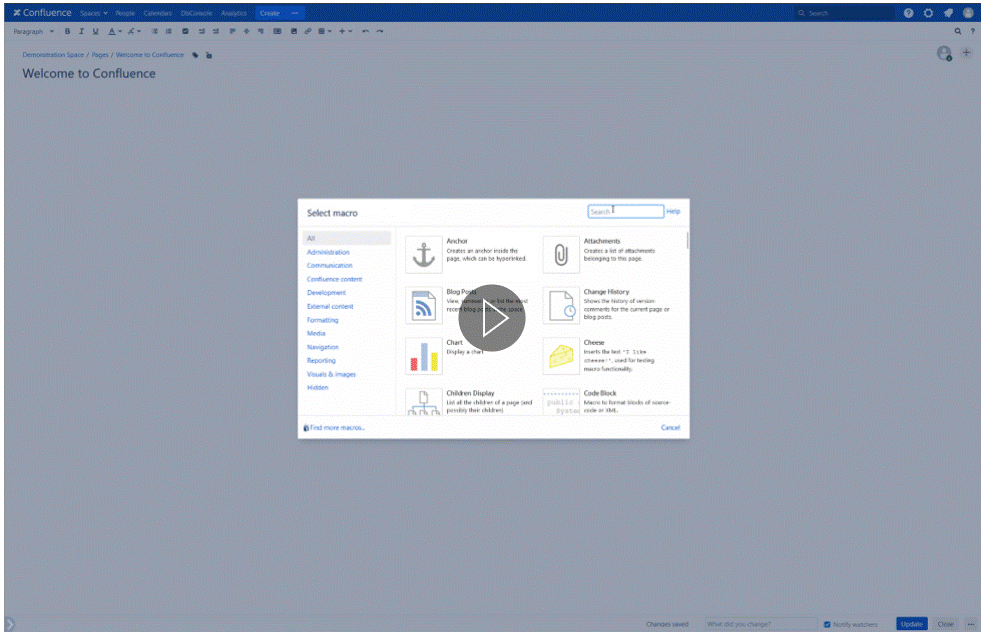
Once the filter has been saved, go back to the space with your table macro, apply it to the CI you created the filter for, save the space, and view the results:
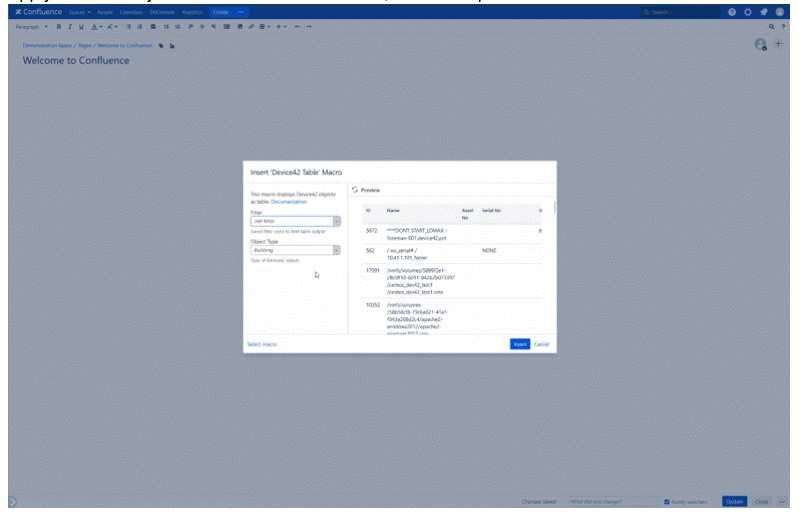
Filter Templates
Filter templates allow you to configure a global filter template that can then be used in any Confluence space with predefined CIs and values for each CI's fields. This is useful when you need a preconfigured template across multiple CI space filters instead of creating a separate one for each space.
-
Access filter templates by clicking the Device42 Filter Templates link from the Device42 Connector menu on the left side of Confluence's main menu.

-
A settings page opens with the following items:

-
Create a new template filter by clicking the Filter Templates dropdown, selecting Create New..., and entering a name of your choice.
-
Select the CIs you want to be selectable from the General Settings tab (in most cases, leave the default settings).
-
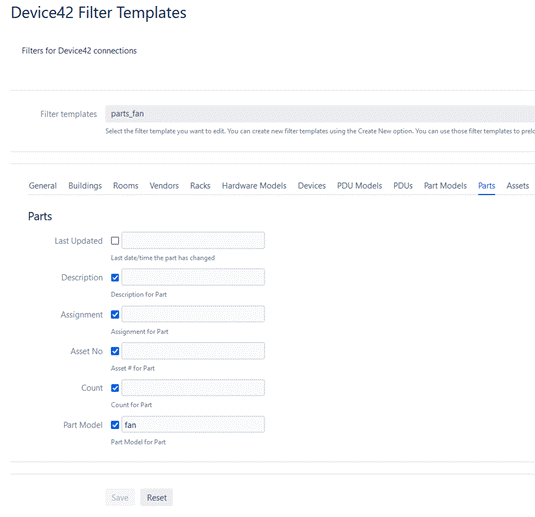
The CI tabs at the top allow you to select and configure the CI filtering you need:

-
Configure the Parts CI to show only fan type items:
-
The search is case-insensitive and uses a "contains" match — any values specified will be checked against all database entries matching the CI's type and containing those values.
-
Click Save at the bottom. If the button is grayed out after entering a value, click outside the text box first, then click Save.
-
You can also click Reset to reset the custom filter you have created. Note that this will delete your custom filter entry and does not apply to the default filter.
-
Once saved, the filter templates will be available in the Space Device42 filter settings dropdown:
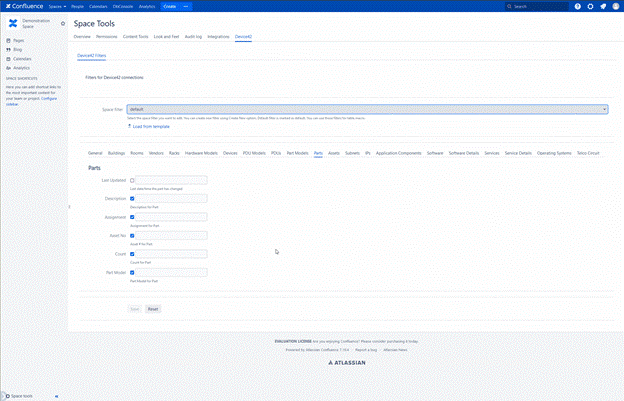
Loading a template filter passes the saved values into your specific space instance filter, which can then be further modified.
Configure Space Restrictions
The Device42 Confluence Connector lets you specify which spaces the Device42 macros can be used in.
-
Log in as a user with Confluence Administrators global permission.
-
From the Confluence administration console, select DEVICE42 CONNECTOR > Device42 Restrict.
-
Turn space restrictions on.
-
In the Allowed Spaces field, select all spaces where you want to allow Device42 macros.
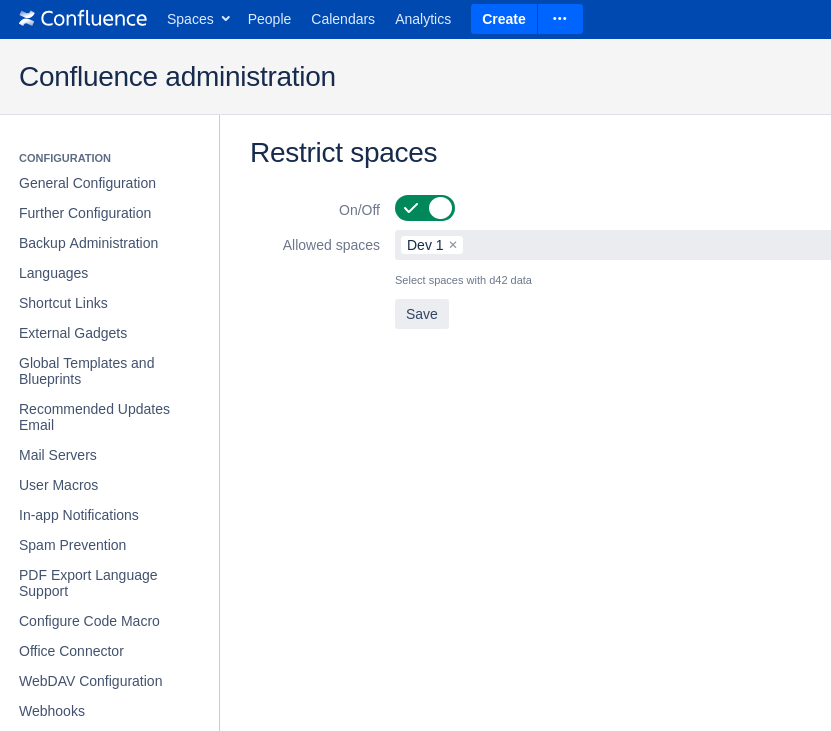
-
Click Save.
If you go to a space where Device42 macros are not allowed, you will see an access denied message if you try to use a Device42 macro.
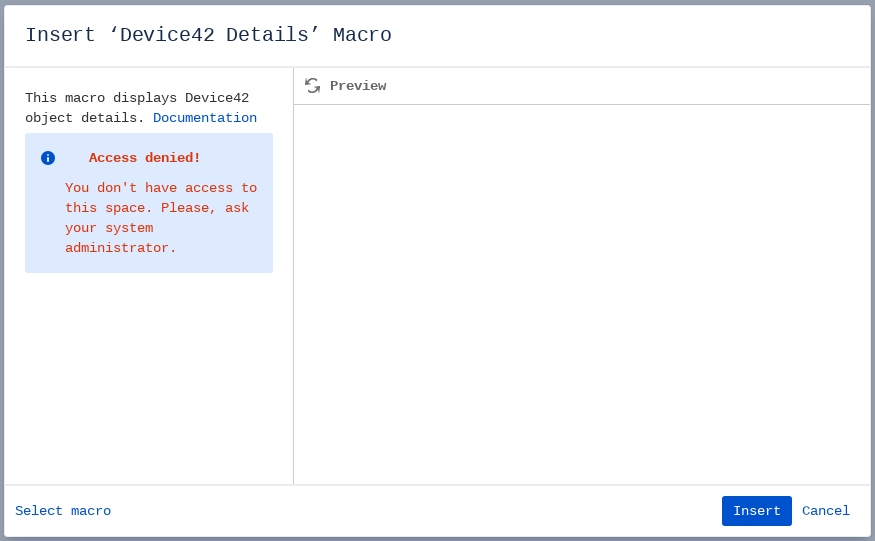
If Device42 macros were previously allowed and used on a page, and the space is later restricted, the data returned by those macros will no longer be displayed.
Use Device42 Macros
You can add information about Device42 CIs inside your Confluence pages using macros. The Device42 Confluence connector provides three macros: Details Macro, Link Macro, and Table Macro. You can apply a space filter to the list of CIs visible in a specific space, and also filter by CI category (see Configure Confluence Space Filters for details).
Object Macros
The Details Macro and the Link Macro both let you add information about one or more specific CIs to a page. They share a similar configuration but differ in presentation: the Details Macro shows a table of CI parameters, while the Link Macro shows a link that displays additional information on hover.
To add an object macro to a page:
-
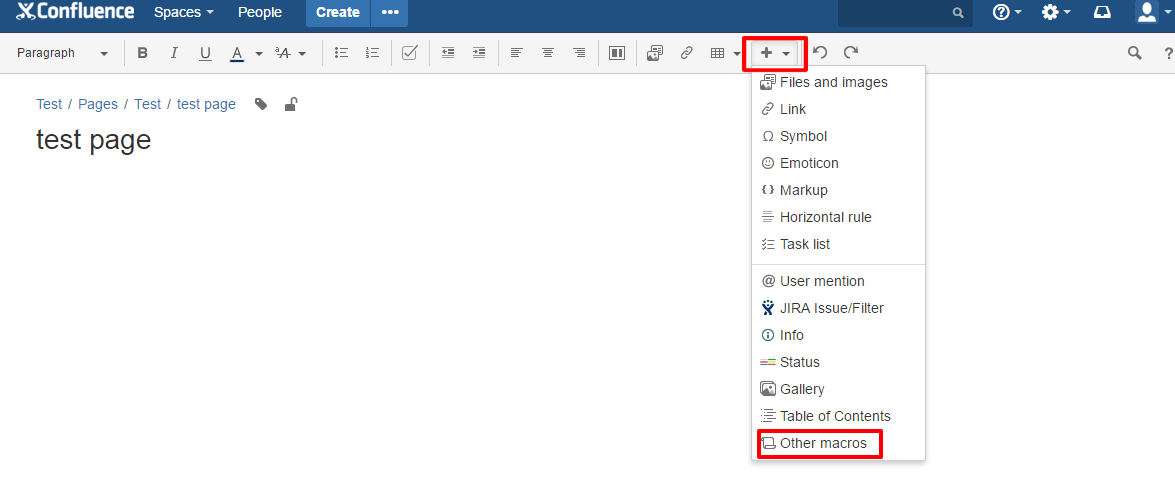
To add a macro to a page, select Insert Other Macros from the top menu.
-
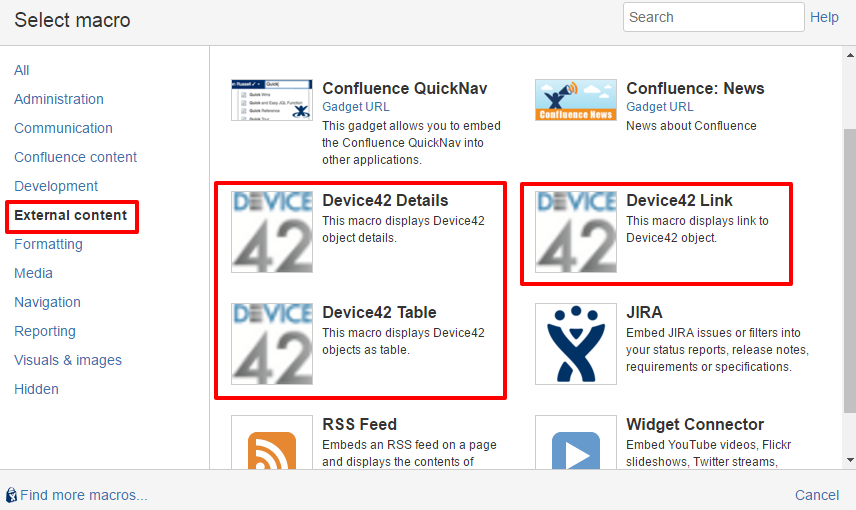
Open External Content to find the three Device42 macros. Use the search field to search for device42 if needed.
-
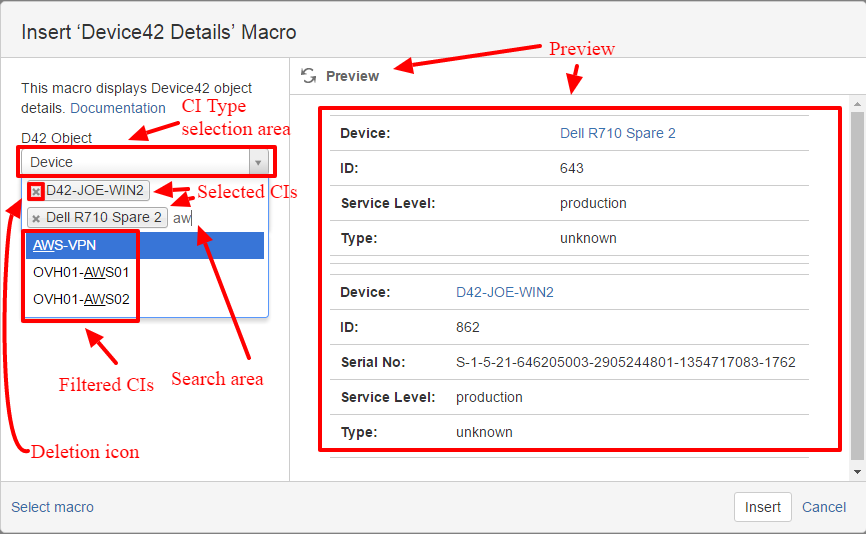
Select the Link or Details macro. Select the CI category and one or more CIs. Use the Preview button to preview the macro.
-
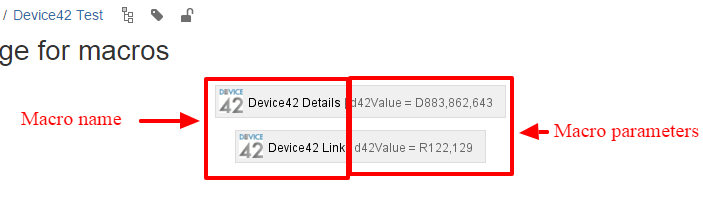
Click Insert to add the macro to the page. In edit mode the macro is not rendered, but you will see the macro name, a one-letter category code, and the CI IDs.
View Device42 Details Macro
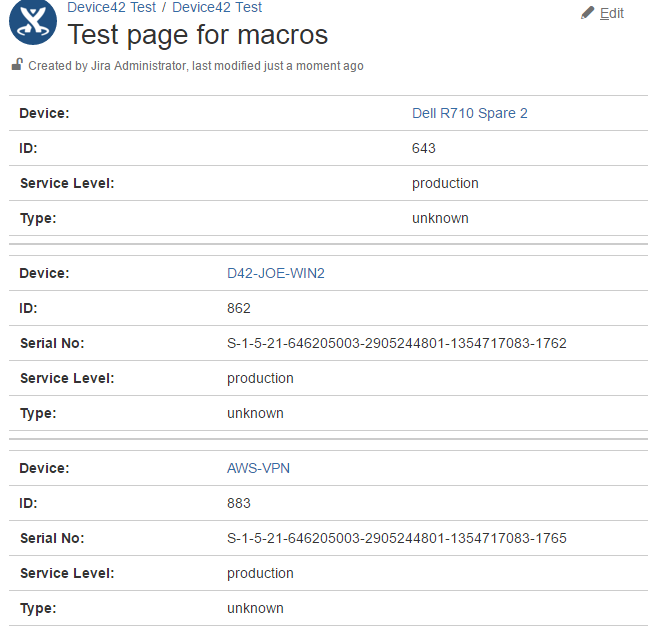
The Details Macro shows CI information in a table. For multiple CIs, a separate table is shown for each CI. Follow the link to access the CI in Device42.
View Device42 Link Macro
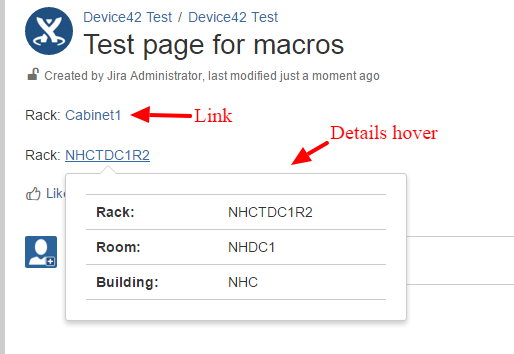
The Link Macro shows a short link to the Device42 application for the selected CI. For multiple CIs, a separate link is shown for each. Hovering over a link shows detailed information about the linked CI inline in the Confluence page.
Search Macro
Unlike the object macros, which link to specific CIs, the Search Macro shows items matching search criteria.
Table Macro
The Table Macro displays a table of CIs of the selected type, with the space filter and in-macro search criteria applied.
In the current version, in-macro search works for Devices only. For other CI types, the space filter parameters are applied.
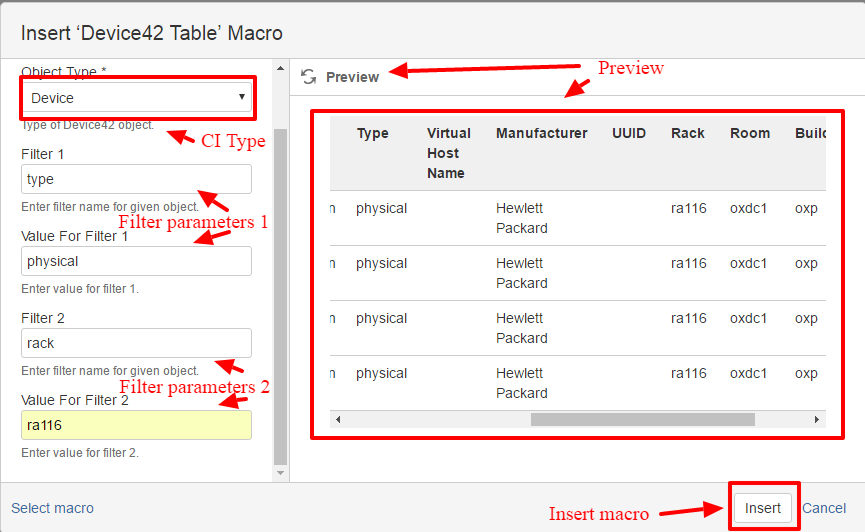
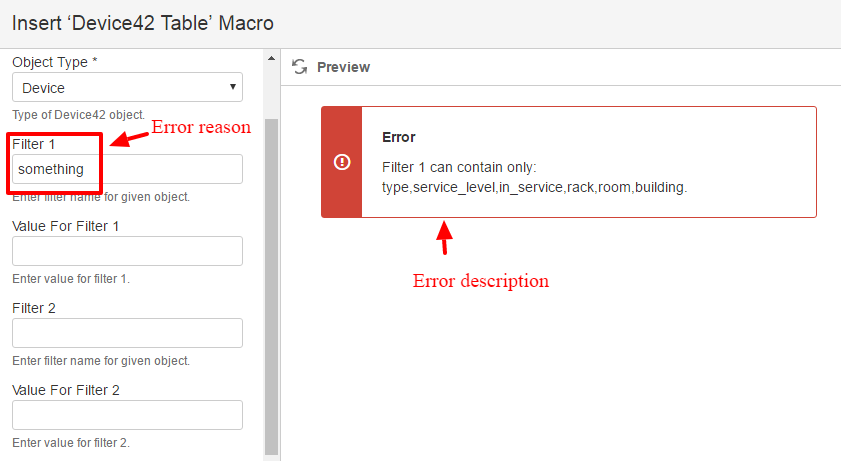
When you select the Table Macro in edit mode, select the CI type as the macro parameter. Optionally, select a search criteria name and value. Two sets of fields are available for "and" searches. The following parameters are supported:
typeservice_levelin_servicerackroombuilding
Enter the exact parameter name in the filter parameters field and the preferred value in the value field. If no CIs match the criteria (including the space filter), the table will show no results.
If you enter an incorrect parameter, an error message is displayed instead of the table.
In edit mode, the macro is not rendered, but you can see the selected CI type and specified filter parameters.

In view mode, the table displays the filtered CIs.